Deploy Hydrolix
Hydrolix deployments follow the Kubernetes operator pattern.
To deploy Hydrolix, generate an operator configuration (operator.yaml) and a custom resource Hydrolix configuration (hydrolixcluster.yaml).
You'll use these files to install and run Hydrolix on your Kubernetes cluster.
Overview⚓︎
- Configure and deploy the Hydrolix operator.
- Configure and deploy a Hydrolix cluster.
- (optional) Use external PostgreSQL.
- Create a DNS record.
- Verify the cluster.
- Log in.
Configure and deploy the Hydrolix operator⚓︎
Hydrolix publishes a service under www.hydrolix.io which provides software descriptions required to install Kubernetes resources for the operator and cluster software.
Prerequisites: Ensure environment variables are set
Instructions on this page depend on settings in environment variables decided before generating configurations. See Prepare your GKE Cluster about the required inputs.
The operator-resources command generates the Kubernetes resource definitions required for deploying the operator, service accounts, and role permissions. The operator manages all Hydrolix cluster deployments. Run the following command to generate a YAML operator configuration file for your cluster:
Apply the generated configuration to your Kubernetes cluster using the kubectl Kubernetes command-line tool:
Configure and deploy a Hydrolix cluster⚓︎
Start with the following Hydrolix cluster manifest template file. This manifest file describes the HydrolixCluster Kubernetes custom resource definition (CRD). The settings in the spec key control the behavior of the cluster, especially the tunables. This example includes minimal settings.
Manually edit the configurable lines in the above template file or programmatically replace the variables from your environment variables with a command like envsubst.
Standard scale profiles size a cluster to fit different cloud providers and deployment sizes.
Default installations use a dev profile. Specify an alternate profile using the scale_profile flag.
Set IP access control⚓︎
The default ip_allowlist is 0.0.0.0/0 which allows incoming network connections into the cluster's service IP.
Configure a network access control list (ACL) to limit which client IPs which can connect to the service IP of your Hydrolix cluster.
See effects of IP access controls, especially on the Hydrolix ACME client.
Enable TLS⚓︎
These instructions recommend TLS certificate provisioning with the Hydrolix ACME client. When the acme_enabled tunable is true, the cluster runs this service.
See Enable TLS for other TLS certificate provisioning options.
Certificate provisioning depends on both the DNS and running cluster
External Certification Authorities (CAs) can't complete the challenge response verification to issue a certificate before
- the hostname is installed in public DNS
- the CA's validators can reach the cluster over plaintext HTTP
Verify the TLS certificate in a later step.
Apply HydrolixCluster config⚓︎
Apply the configuration to your Kubernetes cluster using kubectl
Use external PostgreSQL⚓︎
This step is optional.
Hydrolix provisions a single internal PostgreSQL pod by default. Skip this section unless you want to use an external PostgreSQL service.
For production deployments that need high availability or managed backups, CloudNativePG or Google Cloud SQL can be used instead.
Follow Deploy Production PostgreSQL before ingesting any data.
Create a DNS record⚓︎
To collect the public, external cluster IP for the DNS record, use this command to retrieve the traefik record:
Restarting services if kubectl reports an error
| Example Error Message | |
|---|---|
If you receive an error, try restarting the operator with
Use your authoritative DNS provider to create a DNS record for the hydrolix_url name corresponding to the external IP.
Verify the cluster⚓︎
Check deployment status⚓︎
You can now check the status of your deployment. Run the followingkubectl command to see the status of all pods in your cluster:
List running pods output
You should see output similar to the following. The pod listing changes between versions.
You can also check your cluster status in the Google Cloud console.
Verify TLS certificate⚓︎
Connect to the cluster's service IP by name using a browser or command-line utility like curl to verify the certificate.
See Certificate troubleshooting for more help.
Log in⚓︎
You should have received an email with instructions to set a password and login. If you don't receive this email, or have trouble logging in, try these things:
- Verify the email address in your
hydrolixcluster.yamlfile is correct and that you can receive mail sent to it. - Try the Forgot my password option on the login page.
- If those two steps fail, contact us at support@hydrolix.io.
Once you are able to log in to your Hydrolix cluster, setup is complete, and you are ready to store and query data. Proceed to the next step only if you want to query your data using the Hydrolix Connector for Apache Spark.
(Hydrolix Connector for Apache Spark only) Add a credential to the storage bucket⚓︎
To query the Hydrolix Cluster using the Hydrolix Connector for Apache Spark, configure a credential for your storage bucket. The connector reads partitions through presigned URLs issued by the Hydrolix cluster. On GKE, the cluster's default workload identity credentials can't sign GCS URLs, and signing requires a service account private key. Attaching a service account credential to the storage bucket gives the cluster the key it needs to issue presigned URLs. The following steps walk you through generating a new credential and updating your storage bucket to use the credential.
Step 1: Create a credential⚓︎
Create a Google service account credential. Download the credentials.json file containing your keys from Google. If you need to create a new credential, or you're not sure where to find this file, see Google's Create credentials for a service account instructions.
Installing the credential into the Hydrolix cluster is best accomplished in the UI.
Select Add new > Credential in your Hydrolix cluster UI. Fill out the form with the following:
- Supply a name and description for your credential
- Select
gcp_service_account_keysfor Cloud Provider Type - Upload your Google credentials file
- Review the fields filled in from the supplied credentials file then select Create credential
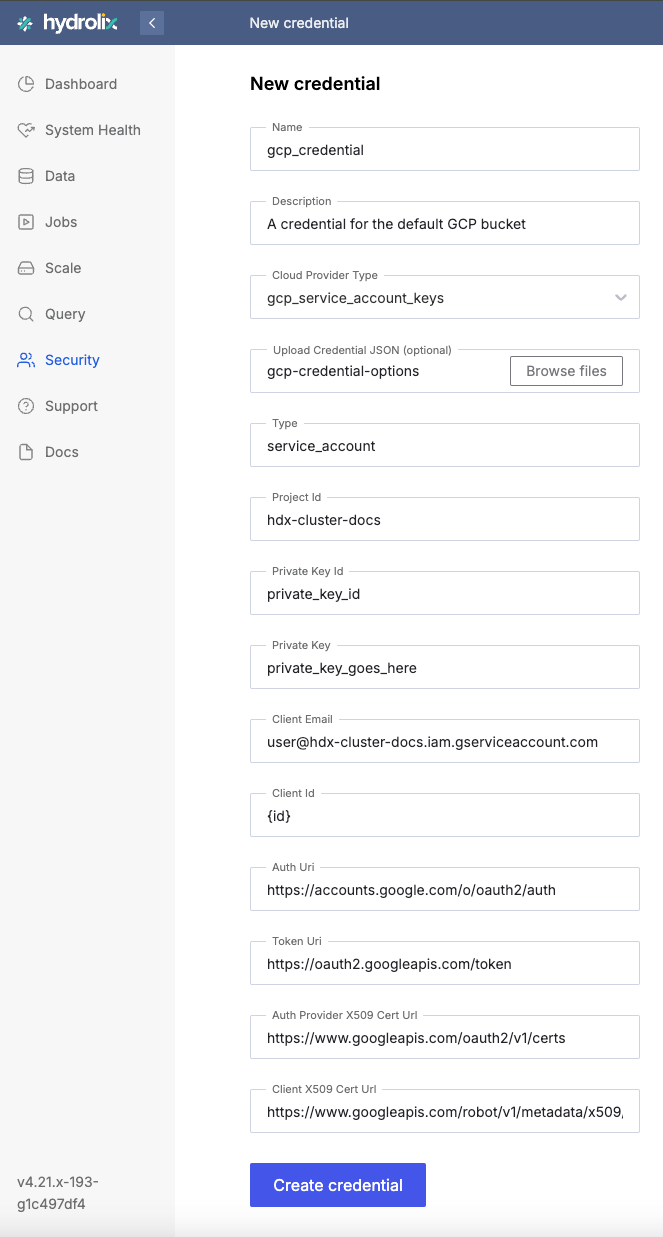
Required credential attributes with examples:
| Example value | |
|---|---|
| Name | my_gcp_credential |
| Description | A credential for the default GCP bucket |
| Cloud Provider Type | gcp_service_account_keys (drop-down list) |
| Upload Credential JSON (optional): | a GCP credentials file name |
| Type | service_account (drop-down list) |
| Project Id | hdx-cluster-docs |
| Private Key Id | private_key_id |
| Private Key | private_key_goes_here |
| Client Email | user@hdx-cluster-docs.iam.gserviceaccount.com |
| Client Id | {id} |
| Auth Uri | https://accounts.google.com/o/oauth2/auth |
| Token Uri | https://oauth2.googleapis.com/token |
| Auth Provider X509 Cert Url | https://www.googleapis.com/oauth2/v1/certs |
| Client X509 Cert Url | https://www.googleapis.com/robot/v1/metadata/x509 |
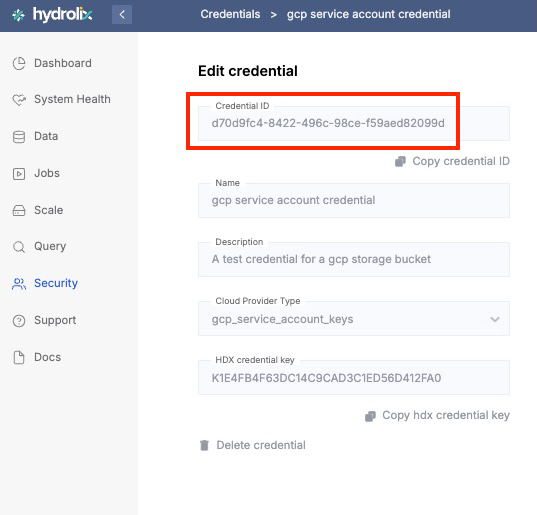
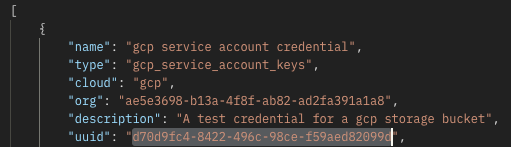
You can review your new credential by navigating to Security > Credentials, then selecting your credential by name. You can also do this using the API through the List credentials endpoint. You will need your credential ID for the next step.
Step 2: Attach the credential to the storage bucket⚓︎
Using the update storage endpoint, in the next steps you will attach your newly created credential to the storage bucket.
Set settings.credential_id to the ID of the credential you created in the previous step. This is the Credential ID in the UI or uuid in the API response to List credentials.
Credential ID in the UI⚓︎
Credential ID in the API response⚓︎
Append ?force_operation=true to the URL.
The following is an example cURL request attaching a credential to the default Google storage bucket:
Once you've completed these steps, your cluster can receive queries from the Hydrolix Connector for Apache Spark.